NVIDIA GRID vGPU
NVIDIA GRID vGPU enables multiple Virtual Machines (VM) to have simultaneous, direct access to a single physical GPU, using the same NVIDIA graphics drivers that are deployed on non-virtualized Operating Systems. Under the control of NVIDIA’s GRID Virtual GPU Manger, which runs in the XenServer Control Domain (dom0), GRID physical GPUs are capable of supporting multiple virtual GPU devices (vGPUs) that can be assigned directly to VMs.
Guest VMs use GRID virtual GPUs in the same manner as a physical GPU that has been passed through by the hypervisor; an NVIDIA driver loaded in the guest VM provides direct access to the GPU for performance critical fast paths, and a paravirtualized interface to the GRID Virtual GPU Manager.
NVIDIA GRID is enabled by default in XenServer v6.5.0.
To enable NVIDIA GRID vGPU on XenServer v6.2.0, customers must install Service Pack 1.
Available NVIDIA GRID vGPU Types
NVIDIA GRID cards can contain multiple Graphics Processing Units (GPU).
For example, GRID K1 cards contain four GK107GL GPUs, and GRID K2 cards contain two GK104GL GPUs. Each physical GPU (pGPU) can host several different types of virtual GPU (vGPU). vGPU types have a fixed amount of framebuffer, number of supported display heads and maximum resolutions, and are targeted at different classes of workload.
Note
At any given time, vGPUs hosted on a physical GPU must all be of the same type. However, there is no corresponding restriction between physical GPUs on the same card. This restriction is automatic and may cause unexpected capacity planning issues.
For example, a GRID K2 card, has two physical GPUs, and can support four types of vGPU; GRID K200, GRID 220Q, GRID 240Q, and GRID 260Q.
Installing the NVIDIA GRID vGPU Manager for XenServer
Customers should install NVIDIA GRID vGPU Software available from NVIDIA – http://www.nvidia.com/vGPU. The NVIDIA GRID software consists of:
- GRID vGPU Manager
(for example: NVIDIA-vgx-xenserver-6.2-331.30.i386.rpm) - Windows Display Driver
(for example: 332.07_grid_win7_64bit_english.exe)
The GRID vGPU Manager runs in the XenServer Control Domain (dom0). It is provided as an RPM file, which must be copied to dom0 and then installed. Please also refer to the User Guide included in the NVIDIA GRID vGPU Software for more detailed installation steps and specifics.
Note: Please be aware that the RPM names below are examples and will most likely be different in your environment.
To do this:
- Use the rpm command to install the package:
[root@xenserver ~]# rpm -iv NVIDIA-vgx-xenserver-6.2-331.30.i386. rpm
Preparing packages for installation...
NVIDIA-vgx-xenserver-6.2-331.30
[root@xenserver ~]
- Reboot the XenServer host:
[root@xenserver ~]# shutdown -r now
Broadcast message from root (pts/1) Wed Sept 25 13:05:31 2013):
[root@xenserver
- After the XenServer host has rebooted, verify that the GRID package has installed and loaded correctly by checking for the NVIDIA kernel driver in the list of kernel loaded modules
[root@xenserver ~]#lsmod |grep nvidia
nvidia            8152994 0
i2c_core
[root@xenserver ~]#
- Note: If at this stage the NVIDIA module (nvidia) is not loaded correctly and you are using XenServer v6.2.0, refer to CTX139834 for troubleshooting.
Verify that the NVIDIA kernel driver can successfully communicate with the GRID physical GPUs in your host by running the nvidia-smi command, which produces a listing of the GPUs in your platform
-
root@xenserver ~]# nvidia-smi
Wed Sep 25 13:05:31 2013 +——————————————————+
| NVIDIA-SMI 4.312.36 Driver Version: 312.36 | |——————————-+———————-+———————-+ | GPU Name | Bus-Id Disp. | Volatile Uncorr. ECC |
| Fan Temp Perf Pwr:Usage/Cap| Memory-Usage | GPU-Util Compute M. | |===============================+======================+======================| | 0 GRIDK1|0000:04:00.0Off| N/A|
|N/A 27C P0 13W/ 31W| 0% 9MB/4095MB|0% Default|| 1 GRIDK1|0000:05:00.0Off| N/A|
|N/A 25C P0 13W/ 31W| 0% 9MB/4095MB|0% Default| +——————————-+———————-+———————-+ | 2 GRIDK1|0000:06:00.0Off| N/A|
|N/A 21C P0 13W/ 31W| 0% 9MB/4095MB|0% Default| +——————————-+———————-+———————-+ | 3 GRIDK1|0000:07:00.0Off| N/A|
|N/A 23C P0 13W/ 31W| 0% 9MB/4095MB|0% Default| +——————————-+———————-+———————-+ | 4 GRIDK1|0000:86:00.0Off| N/A|
|N/A 24C P0 13W/ 31W| 0% 9MB/4095MB|0% Default| +——————————-+———————-+———————-+ | 5 GRIDK1|0000:87:00.0Off| N/A|
|N/A 24C P0 13W/ 31W| 0% 9MB/4095MB|0% Default| +——————————-+———————-+———————-+ | 6 GRIDK1|0000:88:00.0Off| N/A|
|N/A 25C P0 13W/ 31W| 0% 9MB/4095MB|0% Default| +——————————-+———————-+———————-+ | 7 GRIDK1|0000:89:00.0Off| N/A|
|N/A 25C P0 12W/ 31W| 0% 9MB/4095MB|0% Default| +——————————-+———————-+———————-++—————————————————————————–+ |Computeprocesses: GPUMemory|
| GPU PID Process name Usage | |=============================================================================| | No running compute processes found | +—————————————————————————–+ [root@xenserver ~]#Create a vGPU or GPU Pass-through Enabled VM
1. Using XenCenter, create a VM.
To do this, on the toolbar, select New VM and step through the New VM wizard.- Select the Installation Media, Home Server, CPU & Memory.
- GPU-enabled servers will now show a GPU configuration page:
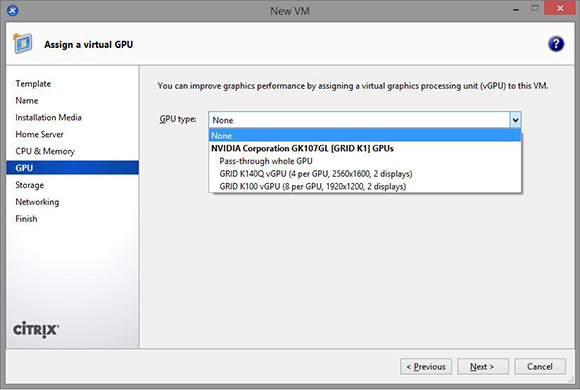
- From the GPU Type drop-down list, select either Pass-through whole, or a vGPU type. (Unavailable vGPU types will be greyed-out)
- Click Next to configure Storage and Networking.
- When you completed your configuration, click Create Now.
In Guest Driver Installation
Notes
When viewing the VM console in XenCenter, the VM will typically boot to the desktop in VGA mode with a 800 x 600 resolution.
The standard Windows screen resolution controls can be used to increase the resolution to other standard resolutions. (Control Panel → Display → Screen Resolution)Install the NVIDIA drivers
To enable vGPU operation (as for a physical NVIDIA GPU) the NVIDIA driver must be installed into the VM.
- Start the VM. In the Resources pane, right-click on the VM, and click Start. During this boot process XenServer dynamically allocates a vGPU to the VM.
- Follow the Windows operating system installation screens.
- Once the operating system installation completes, reboot the VM.
- Install the appropriate driver for the GPU inside the guest. The following example shows the specific
case for in guest installation of the NVIDIA GRID drivers.
a. Copy the 32- or 64-bit NVIDIA Windows driver package to the VM, open the zip file, and run
setup.exe.
- Accept the License Agreement.
- Select Express Installation:
- Once the driver installation has completed, you may be prompted to reboot the VM. Select Restart Now to reboot the VM immediately, alternatively, exit the installer package, and reboot the VM when ready.
When the VM starts it will boot to a Windows desktop. - To verify that the NVIDIA driver is running, right-click on the desktop and select NVIDIA Control Panel.
- In the NVIDIA Control Panel, select System Information.
This will show the GPU Type in use by the VM, its capabilities, and the NVIDIA driver version in use:
Guest support and constraints
The following guests are currently supported for use with GPU pass-through and vGPU:
- Windows 7 (32-bit/64-bit)
- Windows Server 2008 R2 SP1
Customers who are using XenServer v6.5.0 or (XenServer 6.2 customers who have installed Service Pack 1 andHotfixes XS62ESP1009 and XS62ESP1011) can also use the following guests:
- Windows 8 (32-bit/64-bit)
- Windows 8.1 (32-bit/64-bit)
- Windows Server 2012
- Windows Server 2012 R2
XenServer supports only one GPU per VM. Both vGPU and GPU Pass-through are not compatible with XenMotion, Storage XenMotion or VM Suspend. However, VMs, using GPU Pass-through or vGPU, can still be started on any host that has the appropriate resources. XenServer automatically detects and groups together identical physical GPUs across hosts in the same pool. Once assigned to a group of GPUs, a VM may be started on any host in the pool that has an available GPU in the group.